

Understanding the Basics: Why Build Your Own Gaming PC
Building your own gaming PC is like crafting the ultimate machine designed specifically for your gaming needs. Sure, you can buy a pre-built gaming rig, but creating a custom build gives you control over each component and allows you to focus on the games, performance, and features that matter most to you. Whether you’re aiming for a high frame rate, minimal load times, or stunning visuals, building a PC ensures you get the best setup without the limitations of pre-assembled systems.
Another perk of building your own PC is the cost-effectiveness. By selecting your own parts, you can prioritize spending on the things that matter most to you, like a powerful graphics card or more RAM, and skip the features you don’t need. Plus, with your own build, you can easily upgrade specific components in the future. This guide will walk you through the essentials of building a gaming PC, from gathering the right parts to the final touches, so you can level up your gaming experience.
Gathering the Right Components
The first step in building a gaming PC is gathering the essential components. Each part plays a critical role in your PC’s performance, so it’s worth taking the time to choose wisely. Here’s what you’ll need:
1. Central Processing Unit (CPU)
The CPU is your PC’s brain, so it’s essential for both gaming and multitasking. Popular options from AMD and Intel vary in power and price. For gaming, a mid- to high-tier processor will typically offer a smooth experience. Make sure the CPU you pick is compatible with your motherboard.
2. Graphics Processing Unit (GPU)
The GPU is arguably the most critical component for gaming. It handles the graphics and visual effects in your games. NVIDIA and AMD are the top players in the GPU market. For 1080p gaming, a mid-range card like the NVIDIA GTX 1660 or AMD RX 5600 will work great. For 1440p or 4K, look for higher-end options like the NVIDIA RTX 3070 or AMD RX 6800.
3. Memory (RAM)
For smooth gameplay, 16GB of RAM is recommended as the minimum, though 32GB is ideal for future-proofing your build. RAM helps with multitasking and faster loading times, so you’ll want at least two sticks (e.g., 2x8GB) for optimal performance.
4. Storage (SSD and/or HDD)
A solid-state drive (SSD) speeds up load times and helps with faster system boot-up. Many gamers opt for a 500GB or 1TB SSD for their OS and games, and a secondary hard drive (HDD) for extra storage. SSDs are becoming more affordable, so consider at least a 1TB SSD if you can.
5. Motherboard
The motherboard connects all the components, so compatibility is key. Look for a motherboard that supports your CPU and has enough slots for RAM, SSDs, and other components. ATX boards are standard, while microATX and mini-ITX are smaller for compact builds.
6. Power Supply Unit (PSU)
The PSU powers your system, and it’s important to have one with the appropriate wattage. Typically, a 550W to 750W PSU is enough for most builds. Look for a power supply with an 80 Plus certification to ensure efficiency.
7. PC Case
The case houses your components, so pick one that fits your motherboard’s form factor (ATX, microATX, etc.) and has good airflow. Cases come in all shapes and sizes, from minimalist to RGB-loaded, so there’s plenty of room for personal style.
8. Cooling System
Effective cooling keeps your PC running smoothly and extends the lifespan of your parts. Many CPUs come with a stock cooler, but for better cooling (and quieter operation), consider a third-party air or liquid cooler.
Assembling Your Gaming Beast: Step-by-Step Guide
With your components ready, it’s time to assemble your gaming PC! This part may seem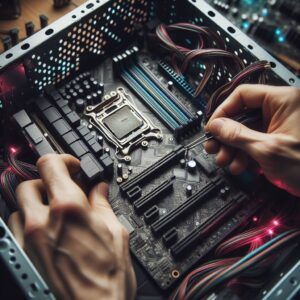
daunting, but with patience and careful steps, you’ll have a fully functional gaming rig in no time.
Step 1: Prepare Your Workspace
Clear a large, static-free space and gather your tools. You’ll need a Phillips screwdriver, an anti-static wrist strap (to avoid static damage), and a flashlight for those small connectors.
Step 2: Install the CPU on the Motherboard
Place the motherboard on a flat surface. Lift the CPU socket lever and carefully align the CPU with the marked corner before placing it into the socket. Lower the lever to secure it. If your CPU came with a cooler, attach it now following the provided instructions.
Step 3: Install RAM Modules
Locate the RAM slots on your motherboard and open the clips on each side. Align the RAM with the slot and press firmly until it clicks into place. If you have two sticks, space them out according to the motherboard’s instructions for optimal performance.
Step 4: Attach the Motherboard to the Case
Place your case on its side, locate the standoff screws, and secure the motherboard in place. Make sure to align the ports with the back of the case.
Step 5: Install Storage Drives
Mount your SSD or HDD in the designated slots inside the case. Secure them with screws, then connect the drives to the motherboard using SATA cables (if applicable).
Step 6: Install the GPU
Locate the PCIe slot on the motherboard, open the slot latch, and insert the GPU by aligning it with the slot and pressing it down until it clicks. Secure the GPU with screws and ensure it’s firmly seated.
Step 7: Connect the PSU
Mount the PSU in its compartment in the case (often at the bottom or back) and secure it with screws. Connect the necessary power cables to the motherboard, CPU, GPU, and storage devices. Tuck away any extra cables to maintain good airflow.
Step 8: Power On and Test
Close up the case and connect your monitor, keyboard, and mouse. Turn on the power and check if all fans and lights are working. If nothing happens, recheck all connections, especially the power connectors.
Fine-Tuning for Optimal Performance
With your PC built, it’s time to fine-tune it for the best performance.
Install Your Operating System
If you haven’t already, insert a bootable USB drive with your OS (typically Windows) and
follow the prompts to install. Once you’re on the desktop, download and install any necessary drivers, especially for the GPU, motherboard, and Wi-Fi/Ethernet.
Adjust BIOS Settings
Your BIOS is where you can configure system settings like fan speeds and memory. To access the BIOS, restart your computer and press the designated key (usually Delete or F2) during startup. Set your RAM to its advertised speed and ensure your system is running in optimal performance mode.
Run Benchmark Tests
Benchmarking your system tests its performance and helps identify any issues. Tools like Cinebench, 3DMark, and UserBenchmark can give you an idea of how your PC stacks up and ensure everything is working as expected. If you notice any underperformance, double-check connections and consider minor tweaks, like adjusting fan speeds.
Overclocking (Optional)
For those comfortable with a bit of experimentation, overclocking can push your CPU and GPU beyond their standard settings. This can improve performance, especially in CPU-intensive games, but be cautious: overclocking increases heat output and power consumption, so monitor your temperatures carefully.
Wrapping Up: Enjoying Your Custom Gaming PC
Congratulations—you’ve just built your own gaming PC! Building a computer is a satisfying journey that doesn’t just end once it’s put together. Your PC is now your canvas, ready for games, software, or even future upgrades as needed. A few final tips: regularly clean your PC to keep dust from accumulating and affecting performance, and stay up-to-date with software and drivers to keep your system running smoothly.
With a little care and regular maintenance, your gaming rig will provide you with endless hours of smooth gameplay, impressive graphics, and a personal sense of accomplishment. Happy gaming!
Good web site! I truly love how it is easy on my eyes and the data are well written. I am wondering how I could be notified whenever a new post has been made. I’ve subscribed to your RSS which must do the trick! Have a nice day!
I am glad that you like my website and the information contained within it. Building your own gaming pc is a huge accomplishment but it is only the first step. You want to make sure that you have the latest drivers for your components, especially for your graphics card. Manufacturers typically release driver updates every month.