
The Ultimate Guide to Building Your Own Gaming PC
Introduction
There’s something special about gaming on a machine you’ve built with your own two hands. Whether it’s the pride of assembling each piece, the thrill of customizing it to your playstyle, or simply knowing you got the best bang for your buck, building your own gaming PC is a rewarding experience. But for first-timers, it can feel intimidating. Which parts do you need? How do you put them together? And what if something goes wrong?
Don’t worry—you don’t need to be a tech wizard to pull it off. In this ultimate guide, I’ll walk you through the essentials of building your own gaming PC in plain, beginner-friendly language. By the end, you’ll not only understand the process but feel confident enough to start.
Understanding the Basics: Why Build Your Own Gaming PC
Before we dive into parts and screws, let’s answer the big question—why bother building instead of buying?
- Customization – Prebuilt systems often come with fixed specs. When you build your own, you get to choose every piece, from the CPU to the case style.
- Performance for the price – DIY builds usually give you more raw power for your money compared to branded prebuilts.
- Upgradability – Built it once? You can easily swap parts later to keep up with modern games without buying an entirely new system.
- Satisfaction – There’s nothing like booting up a system you’ve put together yourself.
In short, building a gaming PC puts you in control—and that’s half the fun.
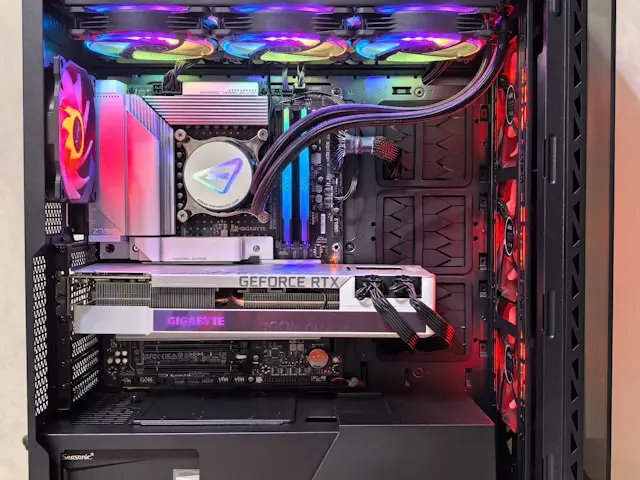
Gathering the Right Components
A gaming PC is basically a puzzle, and the pieces need to fit together. Here’s what you’ll need:
- CPU (Processor): The “brain” of your PC. Intel and AMD are the main choices.
- GPU (Graphics Card): The most important part for gaming—handles visuals and performance.
- Motherboard: Connects everything together. Make sure it’s compatible with your CPU.
- RAM (Memory): More RAM = smoother multitasking and faster load times. 16GB is a great starting point.
- Storage: SSDs are faster than traditional hard drives, making games load quickly.
- Power Supply (PSU): Provides the juice. Don’t cheap out here—quality matters.
- Case: Holds it all together. Choose one with good airflow.
- Cooling System: Keeps your components from overheating. Can be air or liquid cooling.
💡 Tip: Always check compatibility before buying. A CPU might not work with every motherboard, and some cases may not fit larger graphics cards.
Assembling Your Gaming Beast: Step by Step Guide
Here’s the fun part—putting it all together. Think of it like building with adult LEGO pieces,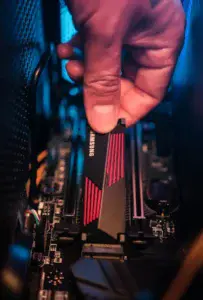 just a bit more delicate.
- Prepare your workspace – A clean, well-lit table works best. Avoid carpet (static electricity is bad for electronics).
- Install the CPU – Gently place it into the motherboard socket. Don’t force it!
- Add RAM sticks – Slot them into the RAM slots until you hear a satisfying click.
- Mount the motherboard – Screw it into the case using the provided standoffs.
- Install the power supply – Secure it into the case and connect the main power cables.
- Add storage drives – Mount SSDs or HDDs in their bays and connect with SATA cables.
- Insert the GPU – Slide it into the PCIe slot and screw it into place.
- Connect all cables – Power, data, and front-panel connectors need to be attached properly.
- Test before closing the case – Power it on to make sure everything lights up and fans spin.
💡 Common issue: If your PC doesn’t start, double-check all power connections. Loose cables are the #1 beginner mistake.
Fine-Tuning for Optimal Performance
Once your PC powers on, the real fun begins—getting it ready for smooth gaming.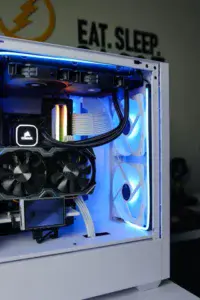
- Install your operating system (OS): Most gamers go with Windows for compatibility, but Linux works for some setups too.
- Update drivers: Download the latest GPU drivers from NVIDIA or AMD, and keep your motherboard drivers up to date.
- Tweak BIOS settings: Enable XMP for RAM to run at full speed.
- Run benchmarks: Tools like 3DMark or even built-in game benchmarks show if your system performs as expected.
- Install essential software: Antivirus, a web browser, and game launchers (Steam, Epic Games, etc.).
💡 Tip: Keep your system clean—dust can affect cooling, and cluttered storage slows things down.
Conclusion
Building your own gaming PC isn’t just about saving money—it’s about creating a machine that’s truly yours. From carefully choosing components to the excitement of the first power-on, the process is both educational and rewarding. And while the first build might feel a little overwhelming, with the right guidance, you’ll quickly realize it’s not as complicated as it seems.
So, are you ready to build your ultimate gaming beast? Or maybe you’ve already built one—what was the most challenging part for you? Drop your experiences, tips, and questions in the comments below. I’d love to hear your stories!
Good web site! I truly love how it is easy on my eyes and the data are well written. I am wondering how I could be notified whenever a new post has been made. I’ve subscribed to your RSS which must do the trick! Have a nice day!
I am glad that you like my website and the information contained within it. Building your own gaming pc is a huge accomplishment but it is only the first step. You want to make sure that you have the latest drivers for your components, especially for your graphics card. Manufacturers typically release driver updates every month.