
How to Troubleshoot and Fix Common PC Hardware Issues
Introduction
Few things are more frustrating than sitting down at your computer only to find that something isn’t working. Maybe your PC won’t turn on, your screen stays black, or your system suddenly starts acting slow or unstable. Hardware issues can feel intimidating, especially if you’re not a tech expert—but the good news is that many common PC problems can be diagnosed and fixed with a little patience and the right approach.
You don’t need to be a professional technician to troubleshoot hardware issues. By learning how to recognize symptoms, narrow down causes, and take simple corrective steps, you can often solve problems yourself or at least understand what needs fixing.
In this guide, we’ll walk through how to identify hardware problems, troubleshoot specific components, decide when to fix or replace parts, and prevent issues from happening again—all in plain, easy-to-follow language.
Identifying the Problem: Symptoms and Diagnosis
The first step in fixing any hardware issue is figuring out what’s actually wrong. Computers often give you clues—you just need to know where to look.
Start by paying attention to symptoms. Does the PC fail to power on at all? Does it turn on but show no display? Are you hearing strange noises, seeing error messages, or experiencing random crashes?
Next, consider recent changes. Did you install new hardware, update drivers, or move your PC? Problems often show up right after something changes.
Basic diagnostic steps can save a lot of time:
- Check all power cables and connections
- Listen for beep codes or fan activity
- Look for warning lights on the motherboard
- Disconnect non-essential devices to isolate the issue
If your PC powers on but behaves strangely, system logs or BIOS error messages may offer helpful hints. Even something as simple as reseating a cable or component can resolve issues that seem serious at first.
Taking a calm, methodical approach helps prevent unnecessary part replacements and reduces frustration.
Troubleshooting Specific Hardware Components
Once you’ve identified the general problem, it’s time to look at individual components.
Power Supply Issues
If your PC won’t turn on, the power supply is often the first suspect. Check that the power switch on the PSU is flipped on and that the outlet works. If the system powers off randomly, the PSU may be failing or underpowered.
RAM Problems

Faulty or improperly seated RAM can cause crashes, freezes, or boot failures. Try reseating the RAM sticks or testing one stick at a time. Memory issues are surprisingly common and easy to overlook.
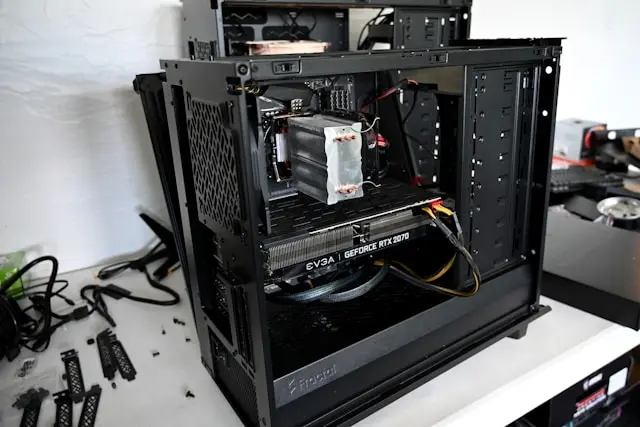
Graphics Card Troubles
No display, visual artifacts, or sudden crashes during gaming can point to GPU issues. Make sure the graphics card is firmly seated and that power connectors are properly attached. Testing with another monitor or cable can rule out display-related problems.
Storage Drive Issues
Slow performance, missing files, or boot errors may indicate a failing hard drive or SSD. Check cable connections and listen for unusual noises from traditional hard drives. Backing up data immediately is critical if a drive is suspected to be failing. Backing up data immediately is critical if a drive is suspected to be failing.
Overheating Components
If your PC shuts down unexpectedly or throttles performance, overheating may be the cause. Dust buildup, poor airflow, or failing fans can all contribute. Monitoring temperatures can help confirm this issue.
Fixing and Replacing Hardware Components
Once you’ve narrowed down the faulty component, you’ll need to decide whether to fix or replace it.
Some issues are easy fixes. Reseating a component, cleaning dust from fans, replacing thermal paste, or swapping a cable can solve many problems without spending money.
Other situations require replacement. Power supplies, failing hard drives, and damaged components are usually safer to replace rather than repair. When replacing hardware, always double-check compatibility with your existing system.
Take proper safety precautions:
- Power off and unplug the PC before working inside
- Ground yourself to avoid static damage
- Handle components by the edges
If you’re unsure about a repair, it’s okay to pause and research or ask for help. Knowing when to stop prevents accidental damage and keeps repairs manageable.
Preventing Future Hardware Issues
Preventing problems is often easier than fixing them. Regular maintenance goes a long way in keeping your PC healthy.
Keep your system clean by removing dust every few months. Dust buildup can cause overheating and fan failures over time.
Ensure good airflow by managing cables and using appropriate case fans. Proper airflow keeps components cooler and reduces strain.
Use a surge protector or UPS to protect your PC from power spikes and outages. Power-related issues are a common cause of hardware failure.
Avoid pushing components beyond their limits. Overclocking without proper cooling or power support can shorten component lifespan.
Finally, monitor your system occasionally. Keeping an eye on temperatures, fan speeds, and system performance helps you catch problems early—before they turn into costly repairs.
Conclusion
PC hardware issues can be frustrating, but they don’t have to be overwhelming. By learning how to recognize symptoms, troubleshoot individual components, and take preventive steps, you can solve many common problems on your own.
The key is patience and a methodical approach. Most hardware issues have simple explanations and manageable solutions, especially when caught early.
Have you dealt with a stubborn hardware issue or discovered a helpful troubleshooting trick? Share your experience in the comments below—I’d love to hear what worked for you and help answer any questions you have!