
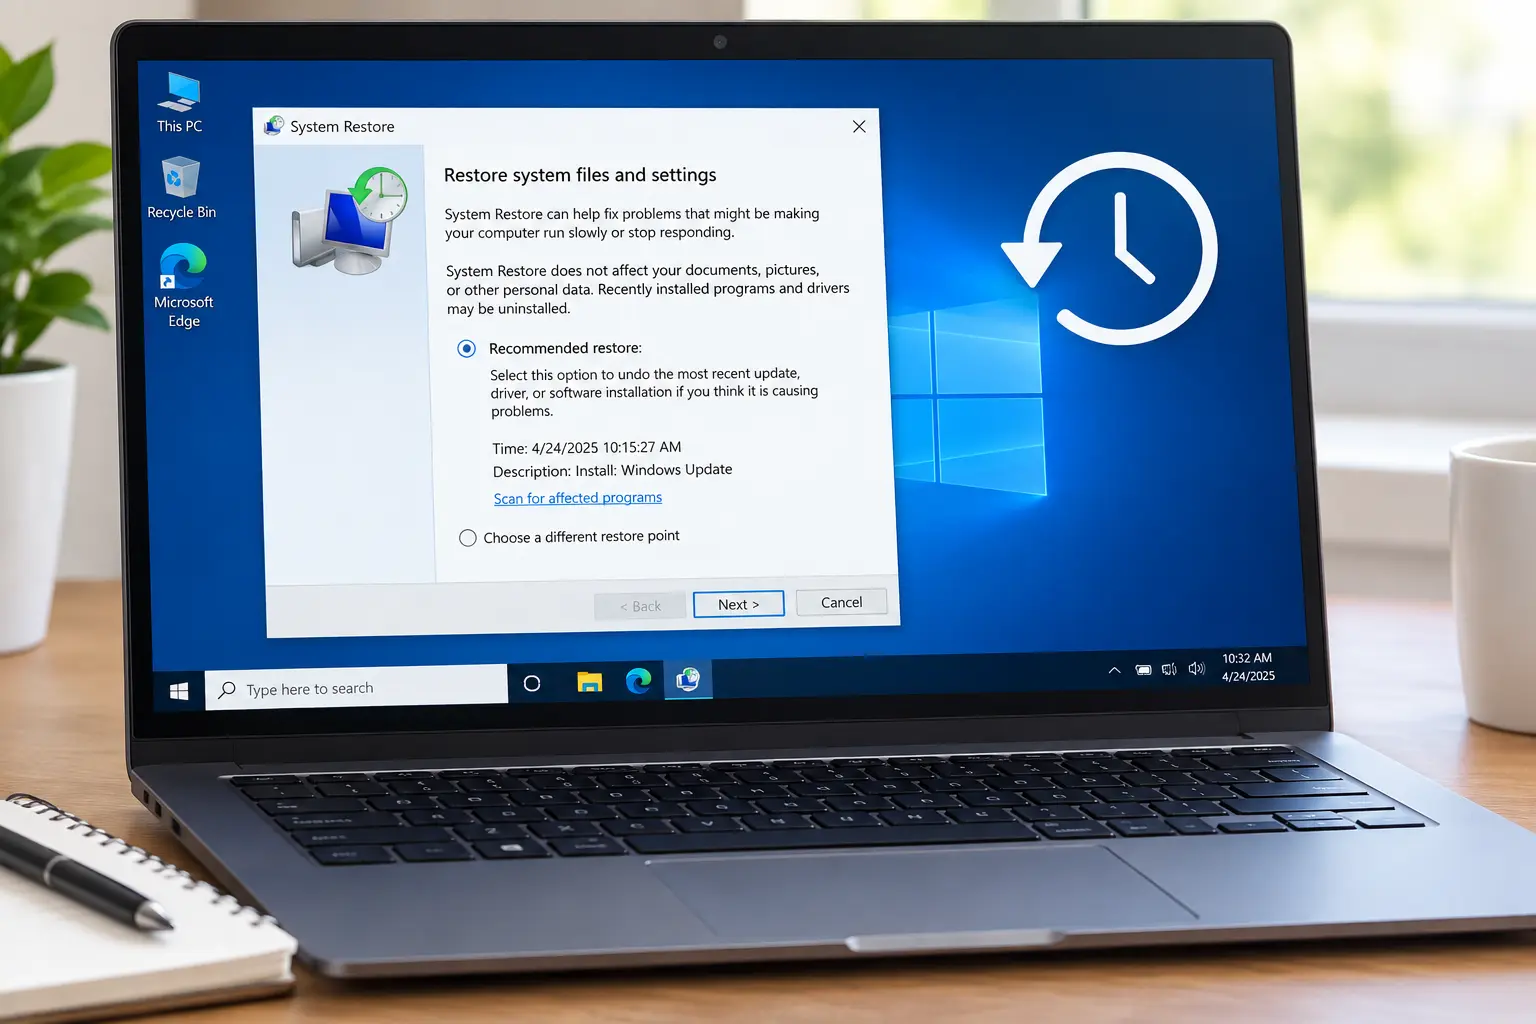
How To Use System Restore In Windows
Have you ever installed a program or driver and then noticed that something went wrong with Windows?
Maybe your computer started acting strangely, a program stopped working, or Windows began having problems after a recent change.
In situations like these, System Restore may be able to help.
System Restore is a Windows feature that can return certain system settings, drivers, and installed programs to an earlier point in time. It can be useful when a recent change causes problems.
The good news is that System Restore is designed to be fairly simple to use, even if you’re not an experienced computer user.
In this beginner-friendly guide, I’ll explain what System Restore does, when you should use it, how to create a restore point, and how to restore Windows to an earlier point step by step.
What Is System Restore?
System Restore is a Windows recovery feature that lets you return your computer’s system files and settings to an earlier state.
Windows can create restore points before certain system changes, such as installing software or drivers.
You can also create a restore point yourself before making a change to your computer.
A restore point is a snapshot involving system configuration/settings, and System Restore can revert system files, registry settings, and installed programs.
Important: System Restore is not the same thing as backing up your personal files.
It generally does not restore your personal documents, pictures, videos, or other files to an earlier version.
Instead, it focuses on Windows system settings, drivers, and certain installed programs.
When Should You Use System Restore?
System Restore can be helpful when your computer develops a problem shortly after making a change.
For example, you might consider using it if:
- Windows started behaving strangely after installing a program.
- A newly installed driver caused problems.
- A Windows setting change created an unexpected issue.
- A program installation caused other software to stop working.
- Windows became unstable after a recent system change.
- You want to undo a recent system change without resetting Windows.
System Restore isn’t normally the first troubleshooting step I’d recommend.
Start with simpler solutions when possible.
How To Troubleshoot Common Windows Problems
If the problem began after a specific change, however, System Restore can be a useful next step.
Before You Use System Restore
Before restoring Windows, there are a few things you should know.
System Restore Doesn’t Replace a Backup
System Restore should not be considered a backup solution.
Your important personal files should still be backed up separately.
If you haven’t already created a backup plan, consider making one before you run into a serious computer problem.
Recently Installed Programs May Be Removed
System Restore can remove programs, drivers, or updates that were installed after the restore point was created. It doesn’t mean that every recently installed program will be removed; rather, drivers/programs affected by the selected restore point may be changed.
Your personal files should normally remain in place, but you should still read the information Windows provides before confirming the restore.
You Can’t Always Undo Every Change
System Restore is useful, but it isn’t a magic “go back in time” button.
It may not fix every Windows problem.
If you’re dealing with a serious Windows issue, you may need additional troubleshooting.
Beginner’s Guide to Windows Troubleshooting Hub Page
How To Create a System Restore Point
If Windows is currently working normally, you can create a restore point before making a major change.
This gives you a possible way to return Windows to its previous state if something goes wrong.
Step 1: Open System Protection
- Click the Start button.
- Type Create a restore point.
- Click Create a restore point in the search results.
The System Properties window should open with the System Protection tab selected.
Step 2: Check System Protection
Look for your Windows system drive, which is usually the C: drive.
Under Protection Settings, check whether protection is turned on.
If it says On, System Restore is available for that drive.
If it says Off, Windows may not have restore points available.
What If System Protection Is Turned Off?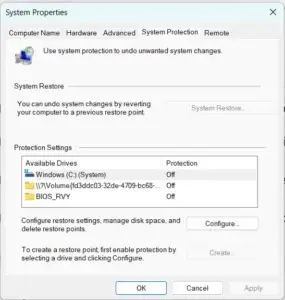
If System Protection is turned off for your Windows system drive, Windows may not have any restore points available.
You can turn System Protection on before creating a restore point.
- Open the Start menu and type Create a restore point.
- Select Create a restore point from the search results.
- Under Protection Settings, select your Windows system drive, which is usually the C: drive.
- Click Configure.
- Select Turn on system protection.
- Use the Max Usage slider to choose how much disk space Windows can use for restore points.
- Click Apply, then click OK.
You can now click Create to make a restore point.
Keep in mind: Turning System Protection on does not create a restore point automatically. You still need to create one if you want a restore point available for future troubleshooting.
Step 3: Create a Restore Point
If System Protection is enabled:
- Click Create.
- Enter a name that helps you remember why you created the restore point.
- Click Create.
- Wait for Windows to finish.
For example, you could name it:
Before Installing New Printer Driver
Once Windows confirms that the restore point was created successfully, click Close.
Quick tip: Create a restore point before installing unfamiliar software, changing important system settings, or making other major changes to Windows.
How To Restore Windows To an Earlier Point
If Windows develops a problem after a recent change, you can use System Restore to return to an earlier restore point.
Step 1: Open System Restore
- Click Start.
- Type Create a restore point.
- Click Create a restore point.
- Select System Restore.
A System Restore window should open.
Click Next to continue.
Step 2: Choose a Restore Point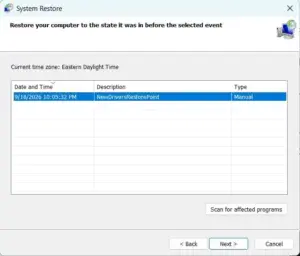
Windows will show available restore points.
You may see information such as:
- The date and time the restore point was created.
- A description of what caused the restore point.
- The type of system change involved.
Choose a restore point from before the problem started.
For example, if your computer started acting strangely immediately after installing a driver on Monday, a restore point from before Monday may be worth considering.
If you don’t see enough restore points, look for the option to Show more restore points if it is available.
Step 3: Check Which Programs May Be Affected
After selecting a restore point, look for the option to Scan for affected programs.
This can show you which programs and drivers may be affected by the restoration.
This is an important step for beginners because it gives you an idea of what Windows may change.
Review the information before continuing.
Step 4: Confirm the Restore
When you’re ready:
- Select the restore point you want to use.
- Click Next.
- Review the information.
- Click Finish.
Windows will warn you that the restore process cannot normally be interrupted once it begins.
Make sure you’ve saved your work and closed your programs before continuing.
Step 5: Let Windows Complete the Process
Windows will restart your computer and begin the restoration process.
This may take some time.
Do not turn off your computer while System Restore is running.
When Windows starts again, you should see a message indicating whether the restoration was successful.
What If Windows Won’t Start?
You don’t always have to start System Restore from within Windows.
If Windows won’t start normally, you may be able to access System Restore through the Windows Recovery Environment (WinRE).
Windows Recovery Environment is a built-in recovery area that provides tools for troubleshooting and repairing Windows when the operating system isn’t starting properly.
To access System Restore through Windows Recovery Environment:
- Start your computer.
- If Windows doesn’t start normally, Windows may automatically enter the recovery environment.
- Select Advanced options.
- Select Troubleshoot.
- Select Advanced options.
- Select System Restore.
You may then be asked to choose your Windows account and enter your password before System Restore opens.
From there, you can select an available restore point and follow the System Restore instructions.
Important: The options you see can vary depending on your version of Windows and how your computer is configured.
If Windows starts normally, using System Restore from within Windows is usually the simpler option.
What If System Restore Doesn’t Fix the Problem?
Don’t panic if restoring Windows doesn’t solve the problem.
System Restore doesn’t fix every type of Windows issue.
If the problem continues, try returning to the basics and work through the troubleshooting process.
You may need to check for Windows problems, driver issues, malware, or other causes.
Beginner’s Guide to Windows Troubleshooting Hub Page
If the problem appeared after a Windows update, you may also want to troubleshoot Windows Update specifically.
How To Fix Windows Update Problems
What If System Restore Fails?
Sometimes System Restore itself may fail.
Possible reasons include:
- The restore point is damaged.
- Windows has another system problem.
- System Protection wasn’t enabled.
- The selected restore point is no longer usable.
- Another software or hardware problem is interfering with the process.
If System Restore fails, don’t keep randomly changing Windows settings.
Write down the error message and search for information about that specific error.
If you’re uncomfortable troubleshooting the problem yourself, consider getting professional help.
Common System Restore Mistakes
Choosing the Wrong Restore Point
Don’t automatically choose the newest restore point.
Look for one created before the problem began.
Assuming Your Personal Files Will Be Restored
System Restore isn’t a replacement for backing up your documents, pictures, videos, and other personal files.
Keep your important files backed up separately.
Turning Off System Protection
If you turn off System Protection, Windows may no longer be able to create useful restore points.
For most beginners, it’s best to leave this feature enabled if you want to use System Restore.
Interrupting the Restoration
Don’t shut down your computer while System Restore is running.
Give Windows time to finish the process.
When Should You Get Professional Help?
System Restore is relatively straightforward, but you shouldn’t feel pressured to keep troubleshooting if you’re uncomfortable.
Consider getting professional help if:
- System Restore repeatedly fails.
- Windows won’t start normally.
- Your computer keeps crashing.
- Important files become inaccessible.
- You suspect a hardware problem.
- Windows has multiple serious problems.
- You’re being asked to make advanced system changes you’re not comfortable with.
A professional can help determine whether the problem is related to Windows, software, drivers, or hardware.
Frequently Asked Questions
Does System Restore Delete My Personal Files?
System Restore is designed to affect Windows system settings, drivers, and certain programs rather than your personal files.
However, you should always keep important files backed up separately.
How Far Back Can System Restore Go?
That depends on which restore points are available on your computer.
Windows may only have a limited number of recent restore points.
Can I Undo System Restore?
In some situations, Windows provides an option to undo a System Restore.
The available options can depend on your Windows configuration and how the restoration was performed.
Should I Use System Restore Before Resetting Windows?
It can be worth trying when the problem appears to have started after a recent system change.
A Windows reset is a much larger step, so System Restore may be a simpler option when an appropriate restore point is available.
Does System Restore Remove Viruses?
System Restore may help reverse some changes caused by malware, but it should not be considered a virus-removal tool.
For example, suppose a malicious program creates a Windows registry entry that causes the program to start automatically. If you restore Windows to a restore point from before the malware was installed, the registry and other affected system settings may be returned to their earlier state.
However, System Restore does not specifically search for or remove malware. A virus or other type of malware may have made additional changes that aren’t reversed by System Restore.
If you suspect your computer has a virus or other malware, use a trusted antivirus or malware-removal tool to scan the computer after troubleshooting. Don’t assume that a successful System Restore means the computer is free of malware.
Relevant Guide:
How To Remove Malware From Your PC Step by Step
Final Thoughts
System Restore can be a useful tool when a Windows problem begins after installing software, drivers, updates, or making another system change.
The important thing is to use it carefully.
Before restoring Windows, choose a restore point from before the problem started and review the programs that may be affected.
Remember:
- System Restore is for reversing certain system changes.
- It is not a replacement for backing up your personal files.
- Choose a restore point from before the problem began.
- Review affected programs before starting the restore.
- Don’t interrupt Windows while the restoration is running.
- Get professional help if you’re uncomfortable with the process.
You don’t need to be a computer expert to use System Restore. Once you understand what it does and when to use it, it can be a valuable tool for troubleshooting Windows problems.
Continue learning here: